Upload a Program From Ev3 Brick to Computer
Welcome to this beginners post where we will go you started with the Lego Mindstorms EV3 Programming software. This guide is applicable whether y'all are using the PC, Mac or Chromebook version of the Lego Mindstorms EV3 software. The content covered in this mail is as well applicative to either the Habitation or Education version.
If y'all have not already done so, please download and install the Lego Mindstorms EV3 Software:
- The Habitation edition can exist downloaded from here.
- The Pedagogy edition can be downloaded from here.
If you need assist with the installation, please click here to view our pace by step guide on installing the software.
Notation that both the Abode and Education editions are free to download and use.
Lego Mindstorms EV3 Software: Abode Vs Teaching Instructor Edition
At that place are quite a few differences between the Domicile and Education Edition of the Lego Mindstorms EV3 Software. The following list outlines the extra programming blocks available within Didactics Teacher Edition when compared the Abode Edition:
- Support for an extra v sensors (yellow blocks), which include:
- Gyro Sensor
- Temperature Sensor
- Ultrasonic Sensor
- Free energy Meter
- NXT Sound Sensor
- An extra cherry block which can be used for Data logging
EV3 Programming Software Foyer
The anteroom (start page) is also different between the ii versions:
Habitation Edition
The Home edition contains an interactive graphic of the main Lego robots you can build with either the Retail or Education kit. Clicking on a robot will open up a project template ready for that specific robot.
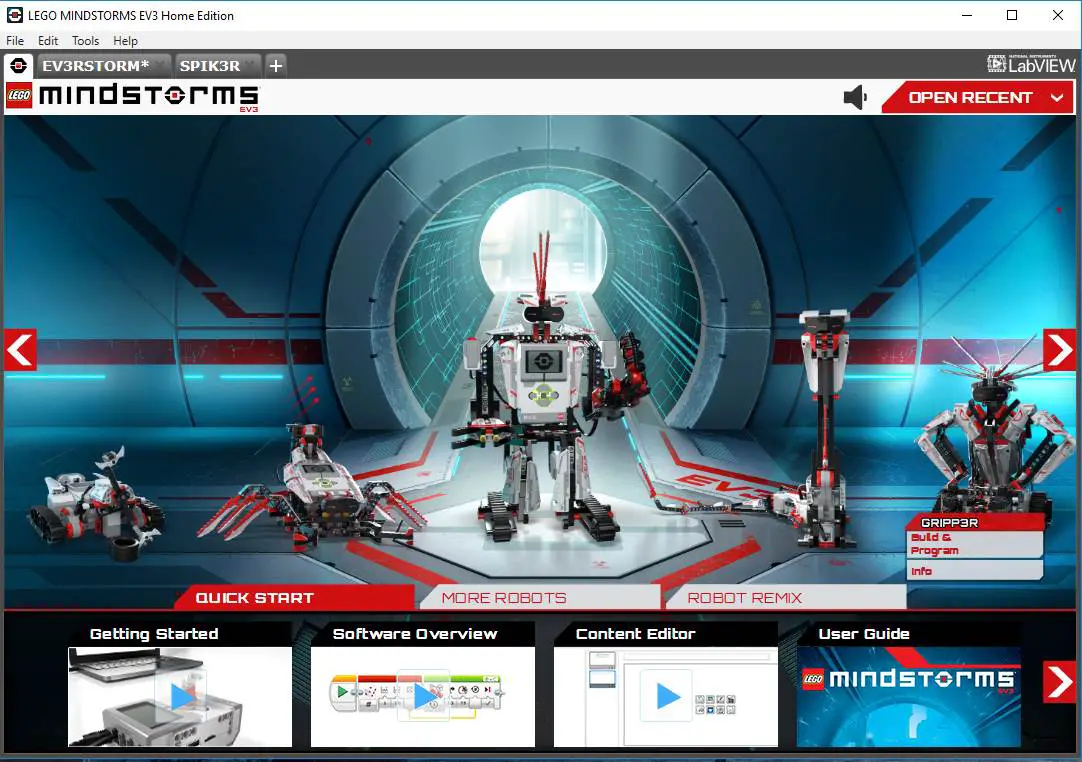
Along the bottom of the entrance hall, the Quick Kickoff links provide some great content to assistance you get started. This includes a software overview and a link to the total user guide (which does come up in handy at times).
Additionally, the 2 other tabs provide content for building additional EV3 robots. More than Robots outline more robots that can be build using the Retail kit, where Robot Remix, outlines more robots that can exist built using the additional kits paired with the Retail / Education EV3 kit.
Education Teachers Edition
The Education edition contains loads of useful information that an educator (or home user) will benefit from.

The bill of fare is driven by the icons on the left hand side and there are four core menus:
- Start Here: takes you through un-boxing the education kit, creating a sample robot and programme
- New Project: from here you tin create either a new Programme or New Experiment
- Tutorials: loads of bully content on EV3 robot basics
- Building Instructions: instructions on building non only the driving
base, but other robots and expansion set up robots.
The other three menus outlined beneath are boosted downloads. If they have not been downloaded they are greyed out and links are provided to download the addon kits. This additional content is also free:
- Blueprint Engineer: Great set of videos and challenges to inspire creative engineering.
- Space Challenge: Space inspired missions and builds plus helpful enquiry information
- Science: scientific discipline focused builds and exercises with accompanying teacher guides and content.
If you are using the educator kit and accept the basics downwardly, I'd recommend exploring the vestibule, particularly the Tutorials section.
Can I Use the Education Teacher Edition EV3 Software with a Retail Kit?
Yes you can. The Lego Mindstorms EV3 Software Education version can be used with the Retail kit (#31313). The Home edition is more than suited the Retail kit as it'southward cut down to the components included inside that kit.
Are project files interchangeable between the Home and Education Edition
Yeah they are, the projection files (.ev3 file extension) are the verbal same format regardless of the software edition used.
Starting a New Project / Program
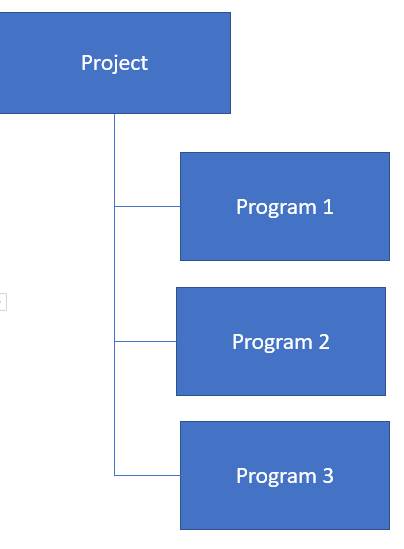
Before nosotros jump into creating a new project I'd like to outline the construction of an EV3 file i.e. the human relationship between a Project and a Program.
A Project tin exist idea of as being a container that stores a set of programs i.e. a project tin can accept multiple programs attached to it. The program itself is made up of a ready of programming blocks which in plow execute the logic we create inside our EV3 robot.
The picture below outlines the project / program structure:
How to Create a New Project: Education Edition
To create a new project within the Lego Mindstorms Software Pedagogy edition:
- From the Entrance hall selectNew Project on the left menu
- SelectNew Plan
- Click the Open push on the far right
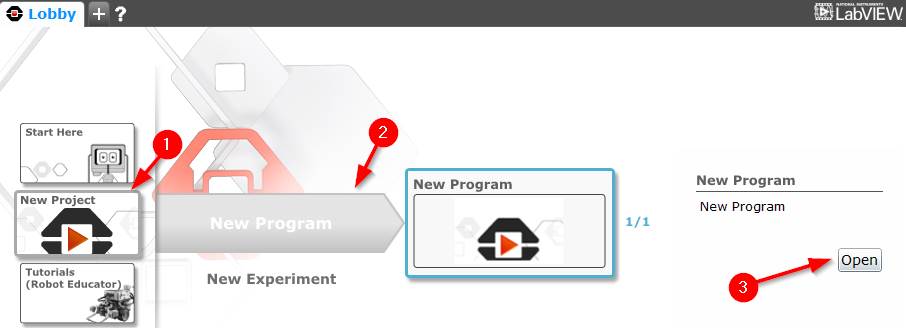
A new project and programme will open within a new tab named 'New Program' to the right of the L
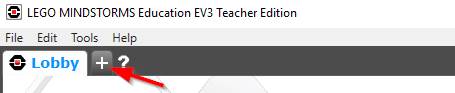
Tip: A shortcut to create a project / program is to click the + button next to the Lobby tab, this will practice the aforementioned thing:
How to Create a New Project: Home Edition
To create a new project within the Lego Mindstorms Software Home edition:
- Click File | New Project
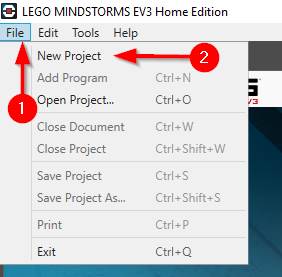
A new projection and programme volition open within a new tab named 'New Program' to the right of the Lobby tab.
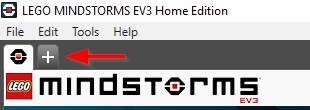
Tip: like the Education edition a shortcut to create a new Projection / Plan is to click the + button to the right of the Lobby tab:
The Programming Interface
The post-obit movie shows the full general layout of the EV3 Programming Software interface:
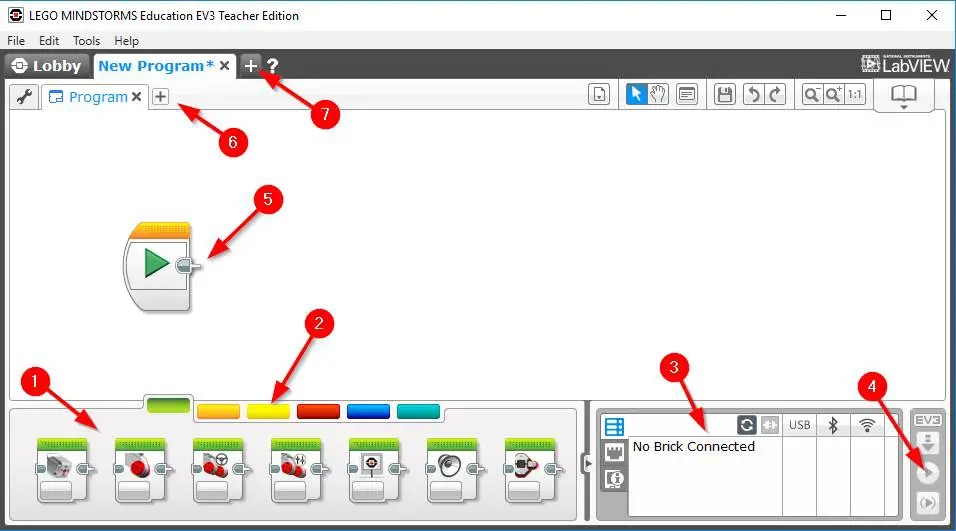
- Programming Blocks
- Programming Block Palettes
- EV3 Brick Information
- Download and Run the program
- Programming Sheet (drag and drop programming blocks to create the program)
- New Program
- New Projection
How to connect the Lego EV3 Brick to the Computer
Before we start to write a program, let's get the Lego EV3 Brick connected to the calculator first.
There are 2 means the Lego EV3 Brick tin be continued to the estimator:
- via a USB cable
- via Bluetooth.
I personally prefer Bluetooth as I there is no need to fiddle around with connecting the cable to either the reckoner or the EV3 robot (and in some
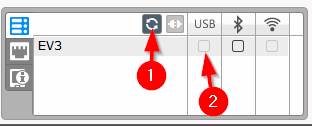
Connecting the EV3 Brick via USB
To connect the EV3 Brick to the reckoner via USB:
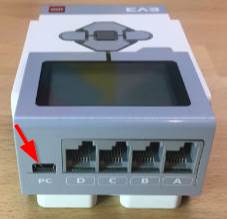
- Connect the USB cable provided with the Lego Mindstorms EV3 kit into the PC port located on the top right of the EV3 Brick (for more than information on the EV3 Brick ports, please see our Brick overview post here).
- Connect the other finish of the cable into a spare USB port on your reckoner
- If the Lego Mindstorms EV3 programming software is already open with a new program prepare, click the refresh push in the condition window (lesser correct) and bank check the USB box once the EV3 brick is displayed:
Connecting the EV3 Brick via Bluetooth
There'south a couple of steps needed to get the Lego EV3 brick working via Bluetooth to your computer:
- Configure Bluetooth on the EV3 Brick
- Pair the Lego EV3 Brick to the reckoner
Don't worry, this only needs to be done once then information technology's washed and in that location's no more messing effectually with the USB cable to connect the EV3 Brick to your computer.
Configure Bluetooth
Check to see if Bluetooth is turned On, if there'due south not a small Bluetooth symbol in the superlative left corner of the screen so:
- Select Settings on the EV3 Brick (spanner choice on the meridian right)
- Gyre down and selectBluetooth
- Click the
center (Ok) button on the checkbox to enable Bluetooth
Now that Bluetooth is on it'due south time to connect it to your computer:
- Ensure Bluetooth is turned On within your reckoner and that the computer is discoverable.
- Select Settings on the EV3 Brick (spanner choice on the top right)
- Scroll down and selectBluetooth
- Press the Upwards button 4 times and select Connections
- Press the Downwardly button to selectSearch
- Once the search is finished, scroll to select your computer from within the list and select Connect.
- Select the Tick button to ostend the connectedness
- Go out the Passkey as the default (1234) and select Enter (the tick button)
- On your computer enter the Passkey of 1234
- The EV3 Brick should brand a sound every bit it connects. Select the tick push on the EV3 Brick to confirm.
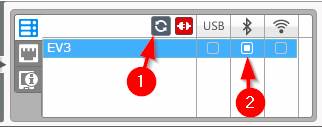
Connecting the EV3 Programming Software via Bluetooth
- From within the Lego Mindstorms
EV3 programming software click the refresh button in the condition window (lesser right) and check the Bluetooth box in one case the EV3 brick is displayed:
Writing a Program
Now comes the fun part, programming the EV3 Brick! By this signal in the post you should have the following completed:
- Lego Mindstorms EV3 Programming software installed and a new Project / Plan opened.
- The EV3 Brick continued to the computer and the EV3 programming software.
To get us started lets write a elementary program that does non crave a build and will run on the EV3 Brick directly:
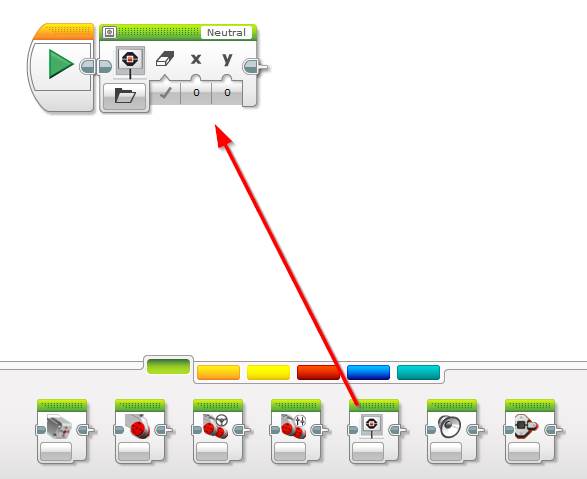
Program #i: Displaying Optics on the Screen
For the first
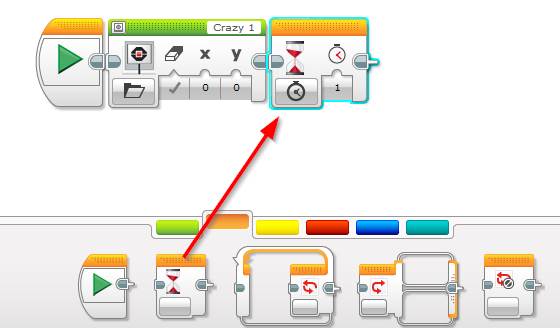
- Elevate the green Display block upwards to the correct of the Start block:
- Past default a set up of eyes looking frontward are displayed, this is chosen the "Neutral" image. Lets change this to prove Crazy 1. To do this, click the discussion "Neutral" in the peak right of the display block and select scroll down to select LEGO Prototype Files | Eyes | Crazy 1
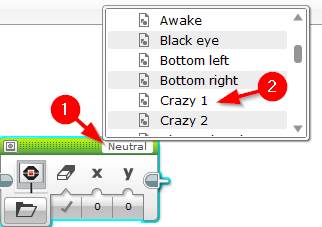
- One time Crazy one has been selected, click outside of the selection box to close it.
- Click the orange button to show the Orange palette
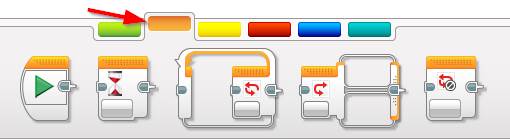
- Elevate the orange Wait block and drop it to the correct of the Display block
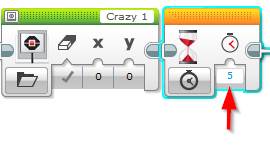
- Lets display the image for v seconds – click the Wait block's Seconds input and update the number to five.
- Fourth dimension to run the programme! Click the Download and Run push from within the EV3 Brick information panel located on the bottom correct
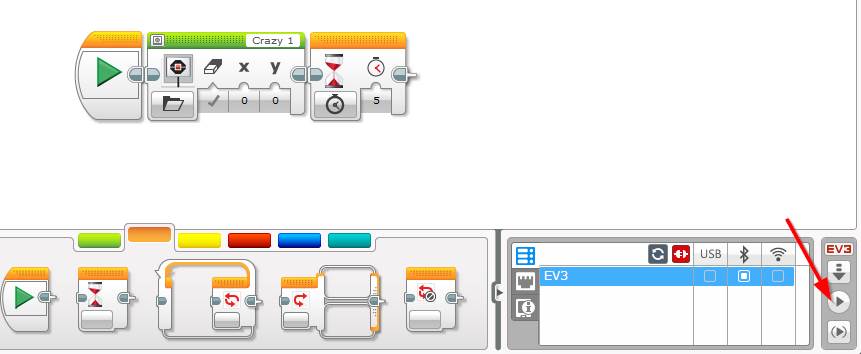
The EV3 Brick should chime when a new programme is downloaded. Check out the screen on the brick, y'all should come across the crazy optics displayed.
Program #2: Moving the Eyes on the Screen
In the adjacent program we'll make the eyes motility. To do this nosotros will apply an orangish Loop block to alternating betwixt two light-green Display blocks – one showing Crazy 1 and the other Crazy ii.
The orange Loop block tin can be used to repeat logic for a given time, count or until a sensor returns a sure value. In our example hither we'll utilise it to run our logic for v seconds:
- Open up a new program by clicking the plus (+) button next to the currently opened tab
- Drag an orangish Loop block and drop it to the right of the Start cake

- Change the loop input from infinity to Time Indicator
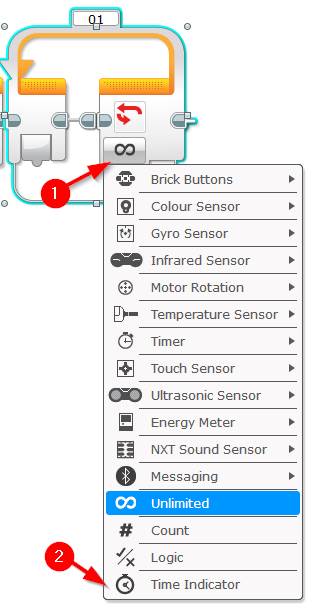
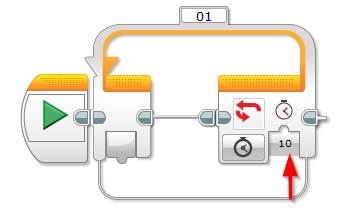
- Set the Loop input's time input to x – this will go far run for 10 seconds.
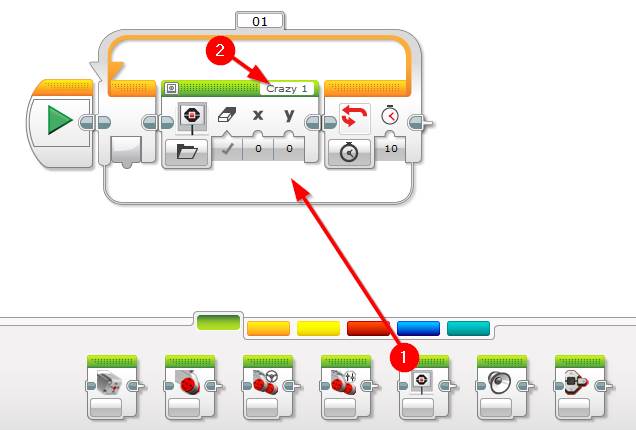
- Drag and drop a dark-green display cake into the centre of the loop and modify information technology to display Crazy i (as we did in the preivous program)
- Elevate and drop an orange Wait block to the right of the green Display block. Leave information technology'southward time input at i for ane second:
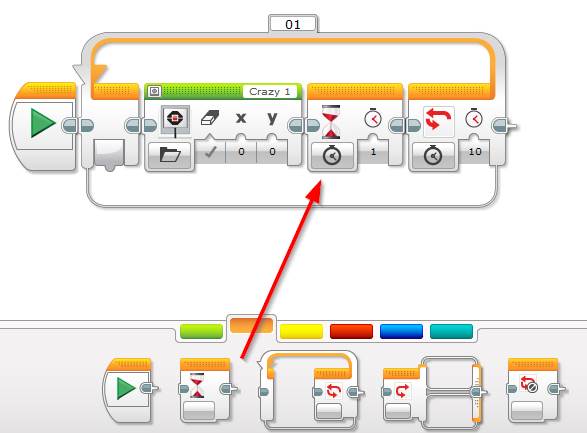
- Elevate some other greenish Display cake to the right of the Timer, and this time set it to display the image named Crazy 2.
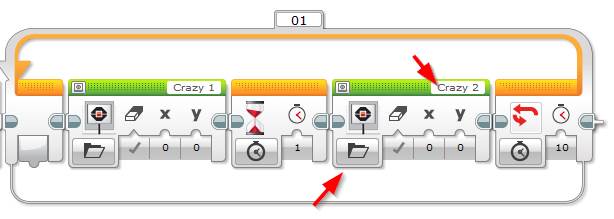
- For the last step lets add another orangish Await cake to the right of the last Brandish block
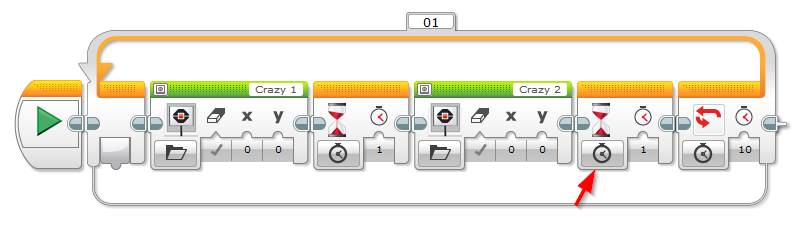
Congratulations the program is now complete! The logic volition display the Crazy ane image for 1 second, and then the Crazy ii paradigm for 1 second and echo this for the 10 seconds set inside the loop block.
Hitting Download and Run button to execute the program.
How to Save a Project
To salvage a project (and all the programs underneath information technology):
- Click File | Save Project
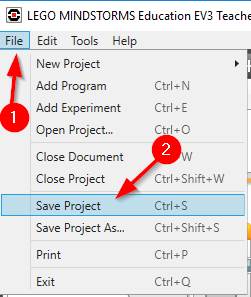
- If demand be,
select the binder where you would like to salve the file, enter the Project file name into the File Proper name box and click Relieve.

Tip: Pressing CTRL + S will do the same thing as clicking File | Save
Experience free to leave a annotate if you run into whatever problem or have whatsoever questions.
Source: https://www.funcodeforkids.com/lego-mindstorms-ev3-programming-software-101-a-beginners-guide/
Belum ada Komentar untuk "Upload a Program From Ev3 Brick to Computer"
Posting Komentar